Ever encountered the error code 0x8000ffff on your PC? A quick guess: it happened when you were trying to update Windows 10 on your computer. Updating Windows is crucial for all your PC components and applications running smoothly.
To fix this, try the PC Repair tool by Outbyte – just run a scan with it in a few easy steps. The tool will locate and remove any junk files to fix system errors. As a result, your computer will start running faster, allowing you to work with more applications and increasing your productivity.
Why Does Error Code 0x8000ffff Appear?
You receive the error 0x8000ffff message when your computer cannot install updates for the Microsoft Windows operating system. PC users mention getting the following:
“There were problems installing some updates, but we’ll try again later. If you keep seeing this and want to search the web or contact the support for information, this may help: (0x8000ffff)”
There are two general reasons for the Windows update error 0x8000ffff: issues with the Windows Update service itself or with some of its components. Solutions are targeted at fixing all of these as a complex to prevent the error code 0x8000ffff from showing up again in the future.
Methods of Fixing Error 0x8000ffff on Windows 10
As it has been mentioned, the error code 0x8000ffff is a generic Windows Update issue. However, the problem may lie deeper and can be related to your Windows system not functioning properly.
Fortunately, there are several methods you can use to quickly fix the issue.
Method 1: Change the Windows Update Startup Type
Sometimes you should just make Windows updates install automatically. To achieve this, do the following:
- Right-click on the Menu button or press Win + X and select Run.
- Type
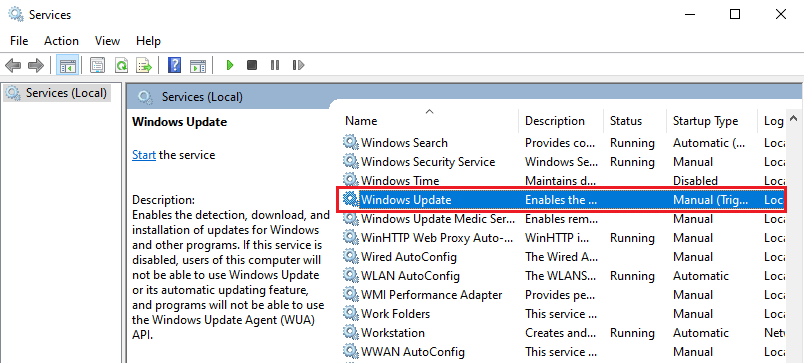
services.mscand hit Enter on your keyboard to open Services. - Move to the Services (Local) tab in the left-hand menu and locate Windows Update in the list of services.

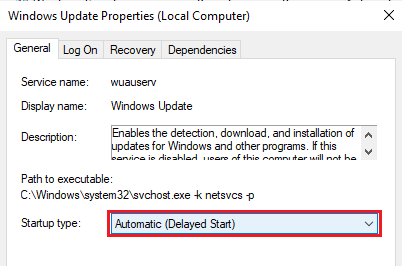
- Double-click on it, and in the General tab, choose the Automatic (Delayed start) option from the drop-down menu in the Startup type section.

- Close the Settings window and restart your PC. It should launch the update process. See if the error 0x8000ffff remains.
Method 2: Run the Windows Update Troubleshooter
The built-in Windows Update Troubleshooter helps to resolve many update-related issues. Run it by taking the following steps:
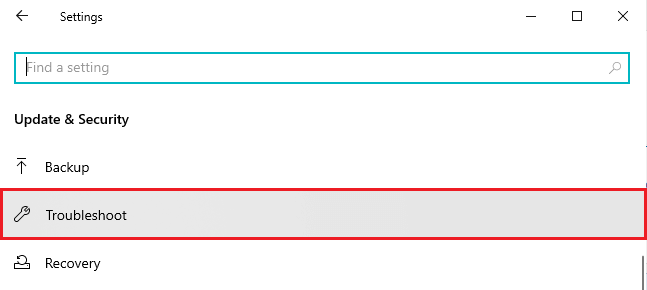
- Right-click on the Menu button or press Win + X and click on Settings. You need the Update & Security section.
- In the opened window, locate and move to the Troubleshoot tab in the left-hand menu.

- Click on Windows Update and press the Run the troubleshooter button. Follow the on-screen instructions.
Running the Windows Update troubleshooter also helps deal with other update installation errors, including error codes 0x8007000d and 0x8007010b. Just make sure that you run the troubleshooter with admin privileges to prevent other issues.
Method 3: Clear the Microsoft Store Cache
Sometimes there is an issue with Microsoft Store. Try clearing its cache and see if you still get the error 0x8000ffff on Windows 10:
- Make sure to close Microsoft Store – it should not be running.
- Right-click on the Menu button or press Win + X and choose Run.
- Type
wsreset.exeand hit Enter on your keyboard. - After seeing the Command Prompt window for a few seconds, you will be moved to Microsoft Store.

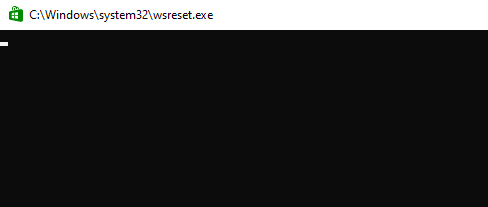
That’s it! The Microsoft Store cache has been reset. If the 0x8000ffff issue persists, try the following method.
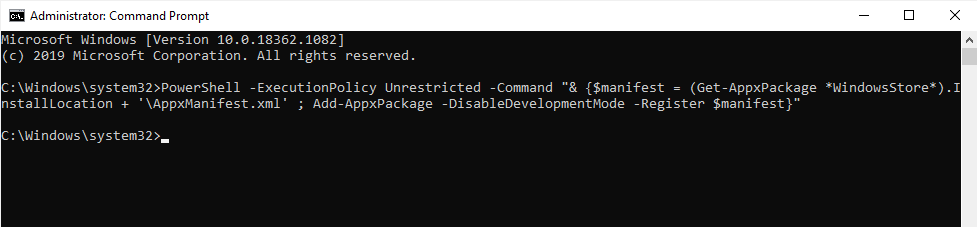
Method 4: Reconfigure Microsoft Store
When clearing the cache is not enough to fix the error code 0x8000ffff, you may want to reconfigure Microsoft Store. Take the following steps:
- Right-click on the Menu button or press Win + X and select Run.
- Type
cmdand hit Enter on your keyboard to open the Command Prompt. Make sure you run it as an administrator. - Type
PowerShell -ExecutionPolicy Unrestricted -Command "& {$manifest = (Get-AppxPackage WindowsStore).InstallLocation + '\AppxManifest.xml' ; Add-AppxPackage -DisableDevelopmentMode -Register $manifest}"and press Enter. - Close the Command Prompt and reboot your computer.
Method 5: Reinstall Microsoft Store
If reconfiguring Microsoft Store didn’t work, try reinstalling it. Do it by using the Command Prompt again:
- Right-click on the Menu button or press Win + X and select Run.
- Type
cmdand hit Enter on your keyboard to open the Command Prompt. Make sure you run it as an administrator. - Type
PowerShell -ExecutionPolicy Unrestricted -Command "& {$manifest = (Get-AppxPackage *WindowsStore*).InstallLocation + '\AppxManifest.xml' ; Add-AppxPackage -DisableDevelopmentMode -Register $manifest}"and press Enter.
- Close the Command Prompt and restart your PC.
Method 6: Run the SFC scan
The 0x8000ffff Windows 10 error may be associated with system issues. Go ahead and run the System File Checker to see if there are any corrupted files preventing your PC from installing Windows updates:
- Right-click on the Menu button or press Win + X and choose Run.
- Type
cmdand hit Enter on your keyboard to open the Command Prompt. Make sure you run it as an administrator. - Type
sfc /scannowon the command line and press Enter.
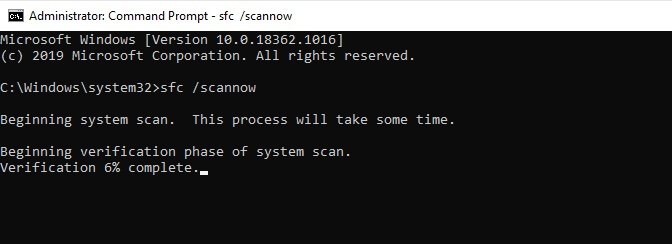
The SFC is a powerful command that can also fix other system issues like error 0x8024001e and error 0x800ccc92.
The scan results will appear as soon as the scan is over. You will see whether the issue has been resolved.
Method 7: Run DISM
Sometimes, during the SFC scan, corrupted files are found but it is impossible to fix issues associated with them. In such a case, run the DISM tool and see if it resolves the problem. Do the following:
- Right-click the Menu button and choose Windows PowerShell (Administrator) or type
CMDand run the Command Prompt as an administrator (depending on your Windows version). - Type
DISM /Online / Cleanup-Image / CheckHealthand hit Enter on your keyboard. - After the process is over, type
DISM /Online / Cleanup-Image / ScanHealthand hit Enter. - Finally, type
DISM /Online / Cleanup-Image / RestoreHealthand hit Enter.
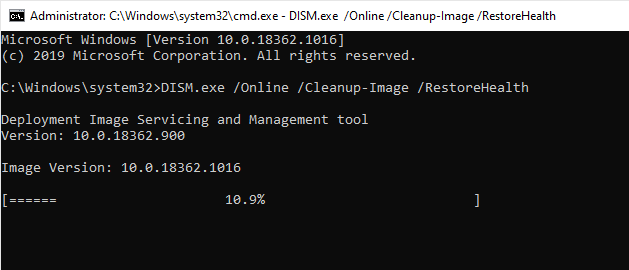
It doesn’t matter which option you go for – check, clean up, or restore health. Just make sure that you finish the scan by restoring health.
The DISM tool works perfectly to solve many other system issues like error 0x800704c7 or error 0xc000012f.
Besides, running DISM is a time-consuming process – check beforehand whether you have at least an hour to perform it.