Several Windows users have reported encountering error code 0x8007000d when downloading Windows updates. The Windows Update error 0x8007000d is common in Windows 10.
In this article, you’ll learn how to fix error code 0x8007000d, what it is, and what causes it in Windows 10.
Pro Tip:
Download the Outbyte PC Repair tool to quickly identify and fix many Windows issues.
What Is Windows Update Error Code 0x8007000d?
Error Code 0x8007000d is a Windows Update error. When the error occurs, there is a file that the Windows Update needs to continue downloading successfully but it is either missing or damaged.
The common symptoms of error code 0x8007000d include:
- Inability to download the new Windows updates
- Inability of Windows to run the update tool to completion
- Inability to upgrade to Windows 10 from an older version
What Causes Error Code 0x8007000d?
The main cause of error code 0x8007000d on Windows 10 is a missing or damaged file that the update tool uses to run Windows updates. But there can be other causes such as:
- Corrupted Windows Update or system files
- Incomplete, pending, or interrupted Windows Update downloads
- Malware infection
- Unstable internet connection
Thus, if you notice this error on your computer, you need to fix it immediately to continue updating your PC and make it less vulnerable.
How to Fix Error Code 0x8007000d on Windows 10
Use the following outlined methods to fix Windows Update error code 0x8007000d:
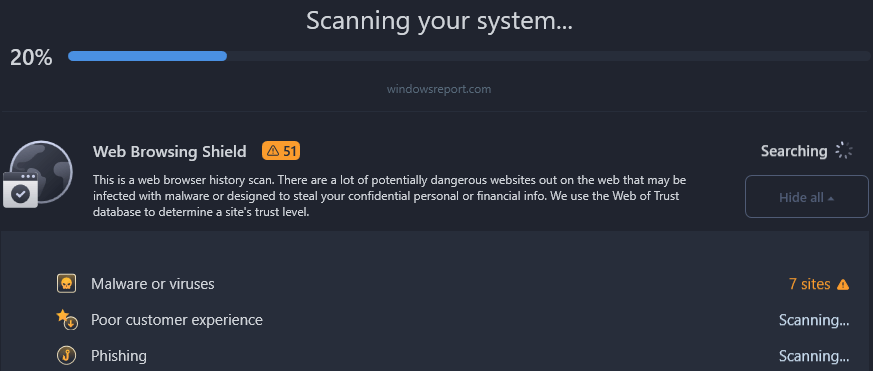
Fix #1: Scan Your Device for Malware or Virus
Malware or virus infections can interfere with Windows operations and cause error code 0x8007000d. To fix this issue, you need to scan your device using a quality antivirus software.
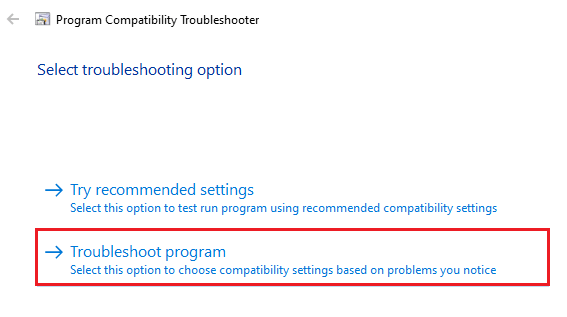
Fix #2: Run the Program Compatibility Troubleshooter
Use the Program Compatibility Troubleshooter if error 0x8007000d occurs when you’re running a specific driver update. This is a built-in Windows utility that helps to fix problems and errors. It applies the best compatibility settings for programs that were running smoothly on older Windows versions but having issues on Windows 10. To access the Program Compatibility Troubleshooter:
- Open File Explorer (Press Win + E keys).
- Navigate to the folder that has the setup for the driver or program you’re trying to install.
- Right-click on the setup file, then click Troubleshoot Compatibility.
- Choose Troubleshoot Program in the Program Compatibility Troubleshooter.
- Next, select the issues you’re experiencing with the driver then click Next.
- Now, choose an older Windows version where the driver will work (we recommend Windows 7).
- Click Next, then choose “Test the program”.
- Now, run the setup as you would run it normally. Check if everything works as it should. If so, choose Yes then save the changed settings for the program.
Fix #3: Reset Windows Update Components Manually
Corrupted system files are one of the main causes of error code 0x8007000d, especially the files contained in the Windows Update folder. Clearing and resetting Windows Update components can help solve the problem and allow you to install the update successfully.
To reset the Windows Update components:
- Open the Windows Command Prompt.
a. Press the Win + S keys, and typecmd.
b. Click “Run as administrator” to open an elevated Command Prompt. - Stop Windows Update services such as BITS, MSI Installer, Cryptographic, and Windows Update by typing (or copy-pasting) the following commands (ensure you hit ENTER after you type each command):
net stop wuauserv
net stop cryptSvc
net stop bits
net stop msiserver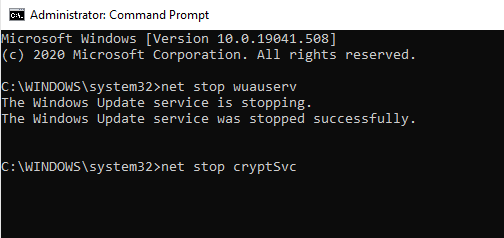

- Type (or copy-paste) the following commands to rename the Software Distribution and the Catroot2 folder backup copies. Again, ensure you hit ENTER after you type each command:
ren C:\Windows\SoftwareDistribution SoftwareDistribution.old
ren C:\Windows\System32\catroot2 Catroot2.old

- Reset Winsock.
a. Typenetsh winsock resetin Command Prompt.
b. Press Enter - Reset the Proxy.
a. Typenetsh winhttp reset proxyin Command Prompt.
b. Press Enter.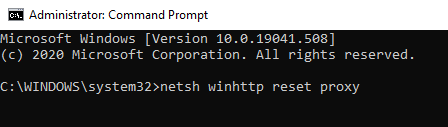

- Next, type (or copy-paste) the following commands to restart the services you stopped earlier and hit ENTER after each command:
net start wuauserv
net start cryptSvc
net start bits
net start msiserver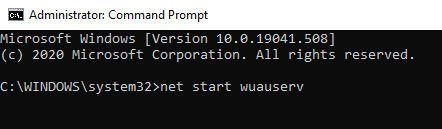

- Finally, type Exit to close Command Prompt. You’ll need to reboot your computer and see if you’ve been able to fix the issue.
Moreover, other Windows Update issues like error 0x80070001 and error 0x80070017 can also be solved in few minutes by these commands.
Fix #4: Run Windows DISM to Fix Error 0x8007000d
- If you encounter error code 0x8007000d, the Windows Deployment Image Servicing and Management (DISM) tool is your best bet to fix the error. It helps to fix corrupted system files and restore the health of the PC.
To run DISM: - Open Command Prompt.
a. Press the Win + X keys.
b. Select Command Prompt (Admin) to open the elevated Command Prompt. If the option isn’t available, open the Start menu, typecmd, right-click Command Prompt, and select “Run as administrator”. - Execute DISM commands.
Type in the following commands and press Enter after each command to execute. The processes may take a while, so wait for as long as it takes to complete.Dism /Online /Cleanup-Image /CheckHealth
Dism /Online /Cleanup-Image /ScanHealth
Dism /Online /Cleanup-Image /RestoreHealth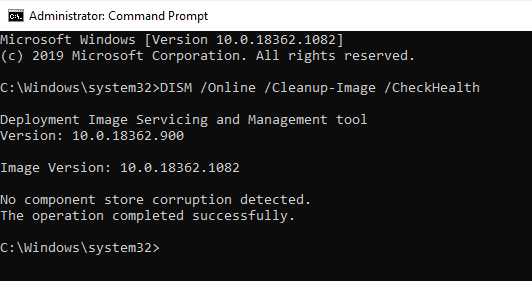

- Exit Command Prompt
Typeexitin Command Prompt and press Enter.
Once you exit Command Prompt, reboot your PC and try to download the Windows update. Take into account, the DISM command could be very helpful to solve error 0xc000012f or error 0x800704c7.