Error 0x8007016A is one of the common issues a user faces with Windows either in accessing OneDrive or during record synchronization. This error generally arises due to corrupted machine files or conflict of the Files On-Demand feature in OneDrive. The good thing is that this issue can easily be resolved by following basic troubleshooting steps in this article on Outbyte.
What is Error 0x8007016A?
This error occurs most with OneDrive, especially in the case of files marked to sync with the cloud but not fully downloaded to the local machine. Sometimes this might be an aftermath of Windows Updates that have affected the functionality of OneDrive and caused problems either in accessing or syncing files.
Other possible culprits behind the problem are the following:
- A Bad Windows 10 Update Has Been Installed: Some users reported that a recent Windows update may have caused the error by breaking OneDrive’s auto-sync functionality.
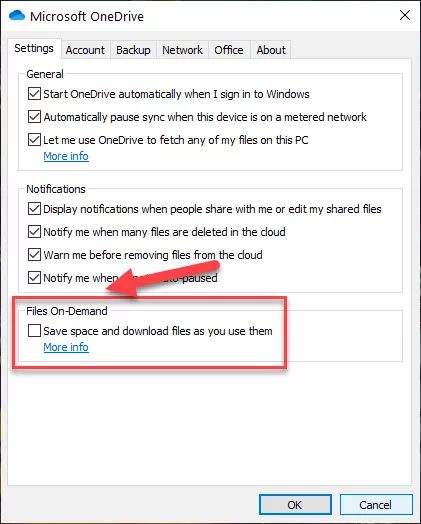
- OneDrive’s File On-Demand Feature Is Enabled: The issue can occur when OneDrive’s File On-Demand feature is enabled. Disabling it has helped many users fix the problem.
- OneDrive Syncing Is Disabled: Third-party applications can disable OneDrive Sync to save power. Sometimes, all it takes is turning it back on.
- Corrupted Files Exist on OneDrive: Corrupt files within OneDrive may also trigger the error. Cleaning up or removing those files can fix it.
- The Current Power Plan Is Keeping the Sync Feature from Working: If the Power Saver mode is enabled, it could stop OneDrive syncing. Switching to Balanced or High Performance power plans can restore functionality.
How to Fix Error code 0x8007016A
We have rounded up some few possible fixes to the error 0x8007016A on Windows 10 below:
Fix 1: Restart Your Computer
Try restarting your computer before indulging into the more complex methods. A quick system restart can resolve temporary system glitches and helps reset system processes.
Fix 2: Check for OneDrive-Related Logs
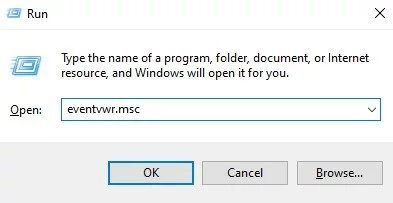
Press Windows + R, type eventvwr.msc, and press Enter.
In Event Viewer, navigate to Windows Logs > Application.
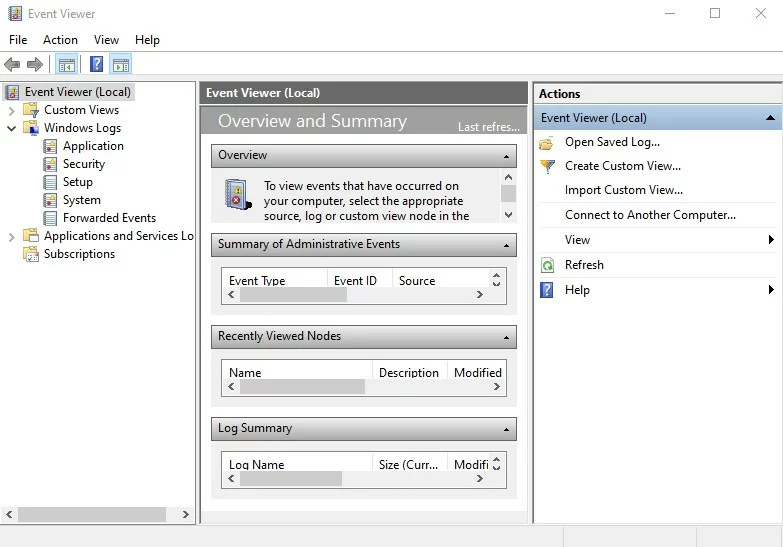
Check for recent OneDrive-related warnings or errors.
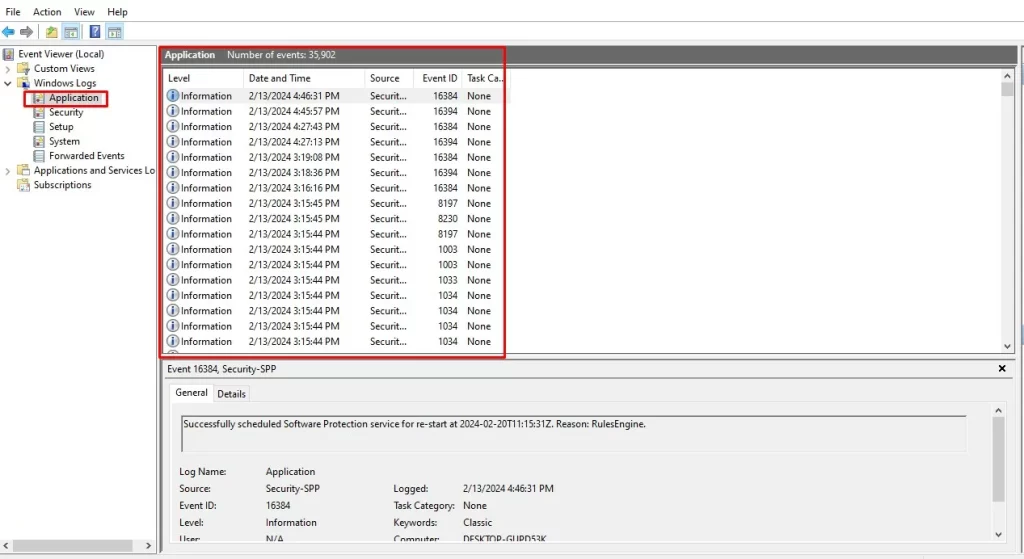
This can help identify any underlying OneDrive problems.
Fix 3: Review Update History for OneDrive Issues
- Open Settings > Update & Security > Windows Update.
- Click View update history.
- Look for any updates related to OneDrive and see if issues started after their installation.
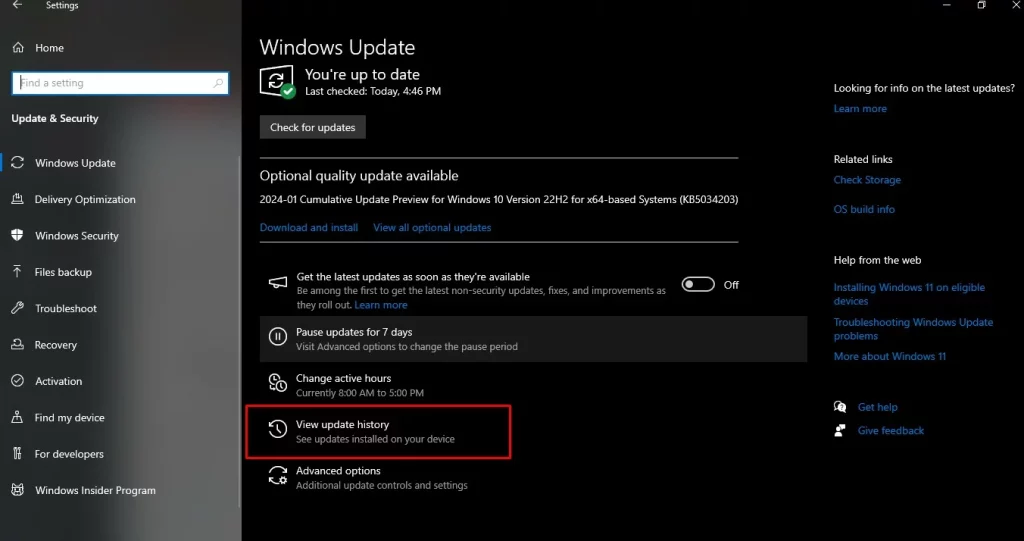
If so, uninstalling or rolling back the update may resolve the issue.
Fix 4: Disable the Files On-Demand Feature
- Right-click on the OneDrive icon in the system tray.
- Select Settings, then go to Files On-Demand.
- Unmark the checkbox “
Save space” and download files as you use them. - After that, restart OneDrive and check whether the issue has been resolved or not.
Fix 5: Use SFC and DISM Tools
The damaged system files can also be a cause of this issue. Run the System File Checker or SFC with the assistance of the DISM tools to scan as well as repair your system:
- Open Command Prompt as Administrator.
- Type
DISM.exe /Online /Cleanup-image /Restorehealthand press Enter. - After DISM completes, run
sfc /scannowand let the tool repair any corrupted files. - Restart your computer.
Fix 6: Fix MOffice
If OneDrive is causing a problem, trying to repair Microsoft Office or uninstalling the software from the computer can be a good option. Note that the steps to do either of these depend on your operating system. For a detailed guide, refer to the following.
For Windows 7:
- Open the Start menu and open Control Panel.
- Click Programs, then Programs and Features.
- Locate the faulty Microsoft Office product and click it. Toward the top, select Change, and then select Quick Repair. Wait for the repair to finish.
Repeat steps 1-4; but this time select Uninstall instead of Change. Restart your computer, and reinstall Microsoft Office.
For Windows 8/10:
- Press Windows + R, type in
controland press Enter. - Click on Programs and Features. Locate the problematic Office product.
- Click on Change; select Quick Repair and click on Repair. Wait until it finishes repairing.
If the problem is still there, repeat steps 1-3 above but this time select Uninstall. Follow the prompts, restart your computer, and reinstall Microsoft Office.
Fix 7: Reinstall OneDrive
If you are still facing a problem, then reinstall OneDrive. You can also create a backup of the OneDrive files by downloading them on an external storage drive.
- Press Windows + X and select Command Prompt (Admin).
- Input the command:
For 32-bit:%systemroot%\System32\OneDriveSetup.exe /uninstall
For 64-bit:%systemroot%\SysWOW64\OneDriveSetup.exe /uninstall - To reinstall OneDrive, use the same commands but remove
/uninstall.
Fix 8: Delete System Junk
Sometimes, hidden junk files on your system may cause errors to appear on your computer. It is, therefore, a good practice removing them every now and then.
To clean system junk easily and fast, resort to a reliable Outbyte PC Repair tool. With a couple of clicks, all the trash files in your system will be identified and deleted.
Fix 9: Update Windows 10 to the Most Recent Build
Make sure your Windows 10 system is up-to-date because Microsoft regularly releases fixes for known issues.
- Go to Settings > Update & Security > Windows Update.
- Click Check for updates and install any available updates.
Fix 10: Disable the File On-Demand Feature
One thing which has been identified is the fact that users of Windows 10 disabled the File On-Demand feature on OneDrive. They had to do that, delete all the semifiles that were synced (with 0 KB size), and then restarted their computers. Here is how to do this:
- Ensure OneDrive is running otherwise restart your computer then open Command Prompt.
- Enter this command:
start %LOCALAPPDATA%\Microsoft\OneDrive\OneDrive.exe /client=Personal - In the system tray, click the OneDrive icon and select More > Settings.
- In the Files On-Demand section, uncheck Save space and download files as you use them.
- Click OK to apply changes and wait for OneDrive to restart.
- Open your OneDrive folder, locate problematic files, right-click, and delete them.
- Restart your computer and check if the issue persists.
Fix 11: Modify Your Power Plan
The 0x8007016A error could also be caused by a restrictive power plan, which may disable OneDrive’s syncing feature. To fix this:
- Press Windows + R and type
powercfg.cpl, then press Enter. - In the Power Options window, switch to High Performance or Balanced mode.
- Restart your computer and check if OneDrive syncs correctly.
Fix 12: Preventing OneDrive File Corruption
Periodically back up your important files using an external drive or some other cloud service. But don’t forget to follow cloud security best practices – use strong passwords, enable two-factor authentication, and ensure your storage provider encrypts your data. Many cloud security companies offer additional tools and guidance to help keep your backups safe and accessible at all times.
- If you think corruption has occurred, try restoring a previous version using the Version History feature in OneDrive.
- Be on the lookout for signs of corruption, such as a file that cannot open or is displaying errors repeatedly.
- Avoid abrupt shutdowns during synchronisation. Also, run periodic scans using some effective antivirus.
By frequent backups of data, usage of SFC and DISM tools, safe computing, you can avoid corruption-related error messages to a fair degree.
Fix 13: Contact a Professional Windows 10 Technician
Well, if none of those fixes above worked, it is about time that you seek professional help from Windows 10 experts. Let them identify the problem for you and troubleshoot, seeking expert advice on how to fix it. If it is a bit complicated for you, let them do the work. They will resolve the problem on your behalf so that nothing gets broken along the way.
People Also Ask
Read about common Windows Errors:
Windows Sandbox Failed To Start Error 0x80070057
Printer shows 0x800f020b Error Code
FAQs
1. What is causing error 0x8007016A?
This error is one of the frequent ones and usually occurs because of several reasons: OneDrive itself does not allow syncing, system files get corrupted, or there is a problem in Files On-Demand.
2. Would restarting the computer fix the mistake?
Yes, at times a simple reboot can clear out the temporary glitches causing the error.
3. Is Files On-Demand necessary?
No, this option can be disabled if it is causing issues. When disabled, this ensures that files are fully downloaded and present locally.


