Some users have reported encountering the Error Code 0x80072f76 – 0x20016 when installing Windows 10 or Windows 8. This occurs when they use the Windows Installer or the Media Creation Tool. They report experiencing the error a few seconds after launching the Microsoft Refresh Tool or Media Creation Tool.
If you’ve encountered the Error 0x80072f76 – 0x20016 on your PC, this article will help you to fix it.
Pro Tip: Download Outbyte PC Repair Tool to delete junk and corrupted files that can cause Windows Error 0x80072f76 – 0x20016.
What Causes the Error Code 0x80072f76 – 0x20016?
The Error 0x80072f76 – 0x20016 is a Windows system update error. It is known to occur when users try to utilize the Windows Media Creation tool to download and install Windows Updates.

When the Error 0x80072f76 – 0x20016 occurs, users receive a message display which says:
“There was a problem running this tool: Error code 0x80072f76 – 0x20016”
Then, Windows advises them to contact customer support.
Several things that can cause the Error 0x80072f76 – 0x20016, including:
- Corrupted Windows Update or system files
- When your PC’s Media Creation Tool is pre-set to open with Windows XP Compatibility Mode
- Windows components/software conflicts, for instance, S.M.A.R.T (HDD/SSD) Monitoring is conflicting with the OS installation
- The Windows version on the PC is configured to reject Windows Upgrade
- Malware attack
- Interrupted download
- Unstable Internet connection
Quick Fixes for the Error 0x80072f76 – 0x20016
Use the following solutions to quickly get rid of the error:
- Restart your computer: Ensure that there is no glitch during PC start. Then, install the Windows Update or Windows Upgrade.
- Scan your computer: Use a quality antivirus application to eliminate any malware that may be causing the error.
- Disable your third-party antivirus program: After scanning your PC, and you realize that the error is still occurring, disable the AV program. Some sensitive AV program may cause false positives.
- Ensure your network is stable: You can tweak your network router to ensure it receives a good signal to support the Windows Update download.
How to Fix the Error Code 0x80072f76 – 0x20016
If none of the quick solutions above worked, try the fixes below:
Fix #1: Run the Windows Update Troubleshooter
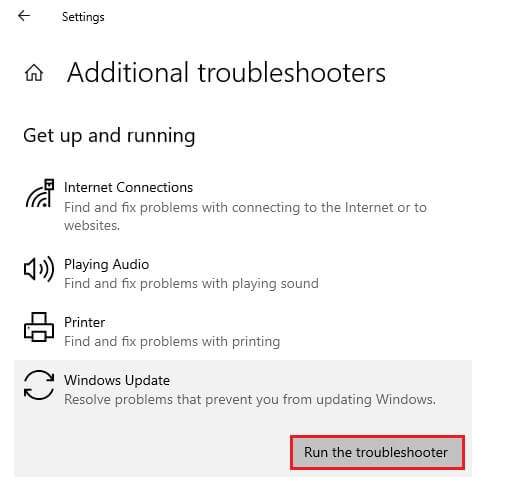
The Windows Update troubleshooter is your best bet to resolve any issue related to Windows Update. The Windows Update Troubleshooter is a built-in Microsoft tool that can resolve PC update issues automatically.
To run the Windows Update troubleshooter:
- Press Win + R keys to open up a Run dialog.
- In the box, type
ms-settings:troubleshootand hit Enter to open the Troubleshooter. - In the Troubleshooter, click Additional Troubleshooters.

- Now, click Windows Update and Run the troubleshooter.
- Wait until the application runs to completion to identify the errors.
- If it identifies an error, click Apply this fix to fix it automatically.
Restart your computer and see if the Error 0x80072f76 – 0x20016 is still occurring when you open the media creation tool or you’re installing/upgrading Windows.
Fix #2: Set the Compatibility Mode to Windows 8
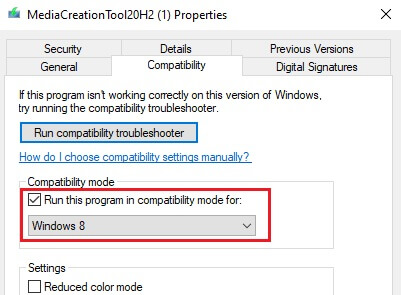
As mentioned earlier, the Error 0x80070002 – 0x2001 can sometimes occur if your PC’s Media Creation Tool is pre-set to open with Windows XP Compatibility Mode. To fix it, you can set the Compatibility Mode to Windows 8. You also need to ensure that the Media Creation Tool is opening with administrative privileges.
- Locate the Media Creation Tool download.

- Right-click on it and choose Properties.
- In the compatibility tab, check the box written Run this program in compatibility mode and click OK.

- Next, scroll down and make sure the box written Run this Program as an Administrator is checked.
- Click Apply to save the changes.
Once done, try again to open the Media Creation Tool and see if you’ll still encounter the error.
Fix #3: Reset Windows Update Components
One of the main causes of the Error 0x80070002 – 0x2001 is corrupted Windows system files, usually contained in the Windows Update folder. Clearing and resetting the Windows Update components can help fix the corrupted Windows files.
To reset the Windows Update Components:
- Open the Windows command prompt.
a. Press Win + S keys, and typecmd(no quotes).
b. Right-click Command Prompt, then select Run as administrator to open the elevated Command Prompt. - Stop Windows Update services such as BITS, MSI Installer Cryptographic, and the Windows Update by typing (or copy-paste) the following commands (ensure you hit Enter after you type each command).
net stop wuauserv
net stop cryptSvc
net stop bits
net stop msiserver
- Type (or copy-paste) the following commands to rename the Software Distribution and the Catroot2 folder backup copies. Again, ensure you hit Enter after you type each command.
ren C:\Windows\SoftwareDistribution SoftwareDistribution.old
ren C:\Windows\System32\catroot2 Catroot2.old
- Next, type (or copy-paste) the following commands to restart the services you stopped earlier (BITS, the MSI Installer Cryptographic, and the Windows Update services) and hit Enter after each command.
net start wuauserv
net start cryptSvc
net start bits
net start msiserver - Type
exitto close Command Prompt.
Restart your PC to see if you’re still encountering the error.
Fix #4: Clear the $WINDOWS.~BT and $Windows.~WS folders
Erasing the contents of the $WINDOWS.~BT and $Windows.~WS cache folders to resolve corrupted system files in this folder can help fix error 0x80070002 – 0x2001.
To clear the $WINDOWS.~BT & $Windows.~WS folders:
- Press Win + E keys to open Windows Explorer.
- On the top ribbon bar click View.
- Check the box next to Hidden items on the right side.
- Now, locate the two folders ($WINDOWS.~BT and $Windows.~WS).
- Open each of the folders individually and empty their contents. To delete the contents, select every item in the folder, and choose delete.

If you’re not able to right-click on them to delete the files, use the following commands to change the access permissions, and force-delete the contents.
- Open the Command Prompt (as shown above).
- To delete the contents of $Windows.~BT directory, copy-paste (type) the following commands and hit Enter:
takeown /F C:\$Windows.~BT* /R /A
icacls C:\$Windows.~BT*.* /T /grant administrators:F
rmdir /S /Q C:\$Windows.~BT\
- Next, to delete the contents of $Windows.~WS directory, type (or copy-paste) the following commands and hit Enter:
takeown /F C:\$Windows.~WS* /R /A
icacls C:\$Windows.~WS*.* /T /grant administrators:F
rmdir /S /Q C:\$Windows.~WS\
If this process can resolve the error and works, you will see a successfully processed message on your screen.
Fix #5: Edit the AllowOSUpgrade Value via Registry Editor
The Error 0x80070002 – 0x20016 will occur if your current Windows OS version is configured to reject an OS upgrade. You can edit this configuration to AllowOSUpgrade:
- Press Win + R keys to open up the Run dialog box, then type
regeditand hit Enter. - In the Registry Editor, on the left pane, navigate to the following location:
Computer\HKEY_LOCAL_MACHINE\SOFTWARE\Microsoft\Windows\CurrentVersion\WindowsUpdate\OSUpgrade
- Once you locate the OSUpgrade, navigate to the right pane, and right-click on a space.
- Now, select New > DWORD (32-bit) value then name it AllowOSUpgrade.
- Next, double-click on the AllowOSUpgrade, then change the Value to 1 and change the Base to Hexadecimal.
- Close the regedit window and restart your PC.
At the next Windows startup, recreate the activity that was triggering the Error x80070002 – 0x20016 and see if you’ve been able to resolve the issue.
Wrapping Up
We believe that the solutions we’ve presented in this article will help you fix the Error x80070002 – 0x20016 and allow you to proceed with your activities without any glitch. Keep your PC clean to avoid encountering such errors.


